

The beast of an offset smoker
About two months ago, I read the Arron Franklin's Franklin BBQ book cover to cover in 3 days (including bringing it along to the hotel where we were celebrating my girlfriend's birthday, so her slight confusion and concern - though thankfully for her, we did eat at the restaurant she had in mind).

The book is a seriously inspiring read and several days after completing the book, I was researching 'proper' offset smoker BBQ's on Facebook Marketplace for what felt like 20 hrs a day. My existing 1mm metal cheap offset smoker (COS) was getting pretty rusty, leaked all over the place and didn't seem to be able to hold a temperature consistently even when using charcoal. Using the large kamado / egg style BBQ was much better at holding a temperature and a completely different beast in terms of it's fuel usage (one large load of good quality charcoal would run for 4 hrs with proper airflow control) but ... I'd been persuaded that for really BBQ brisket and pork ribs, I needed to use dry oak and run a real fire.
When the right model turned up at the right price a few days later with a 210l (50 gallon) capacity cook chamber, I was onto the phone asking my good friend Pete, who was also in BBQ but more into the braai thing being South African, if he fancied taking a little adventure trip a few hours away in his van in the horrible weather of a cold, UK rainy March evening.

6 hrs later, after strapping down my new offset smoker in the back of a van with the chimney sticking out the top of the back doors and LOTS of straps, we were unloading my lovely new offset smoker into the garden area that had been prepared to hold the beast of a smoker. It wasn't exactly what I was after in terms of style as I wanted a more rustic feeling smoker, so there was some working coming up in terms of modifying the smoker to my design specification.

Modifying the 'beast' offset smoker
The following day, using a battery powered drill with wire brush attachments and later in the day, an angle grinder with sanding flap attachment, the 'beast' started to get it design refresh in what turned into a multi-day effort to achieve several goals:
- Remove the anthracite 2k paint from main cook chamber, firebox and chimney to exposed metal
- Create the right looking protective surface on the exposed metal using heat & vegetable oil
- Use 18th century Japanese techique of shou sugi ban to protect the oak wood work surface, as well as give it authentic use look
- Install handles, storage hooks, undersurface basket & build a wood storage unit to fit under the smoker
- Add Pro Smoke 4" BBQ temperature gauge + modify the seal of smoker for better heat retention
- Install outdoor, rustic lighting to enable ease-of-use during night time BBQ cooking sessions
Sanding the smoker skin to expose metal
After a first burn, the paint on the skin of smoker was bubbling. Using a flap disk, angle grinder & elbow grease, the metal was exposed (which promptly rusted-up overnight on night one).

Using heat & vegetable oil to create protective seal for metal
After the overnight rust issue, the metal needed further grinding before using a fire inside the cook chamber itself in the right places, a beautiful coppery patina could be build up stage by stage (in what ended up being 3 separate 'burns') followed by heating the metal with a butane blow torch in areas to 500 degrees before spraying with vegetable oil and wiping with a clean cloth to polimerize the oil on the surface.
Vegetable oil was using rather than linseed oil because of issues with it being food safe. Boiled linseed oil / flaxseed oil rather than the 'varnish' kind is essential but standard vegetable oil seems to work just as well.

Shou sugi ban protecting the oak wood work surface
To give the offset smoker an authentic used look and keep with the feel of open fire, the oak wood was treated using a blowtorch to char the surface and then using a wire brush to brush the surface before applying a vegetable oil coating that creates a beautiful rainbow effect in the wood and brings out the burnt grain.

Adding in Prosmoke BBQ temperature thermometer gauge
The BBQ didn't have any thermometer to measure internal temperature and even though the 'beast' offset smoker would utilise an Inkbird wifi temperature monitor system, addition of a large BBQ thermometer for quick visual checks made sense.
For the 4" version of this BBQ thermometer, a large stepped drill bit was required to get the right size hole in the right place. And the right place, after much internet research and tests using wired temperature probes across different area of the smoker, was close to the grate and close to the chimney intake.
This location rule seems to apply to this specific shape of smoker where the chimney intake is at grate level which brings the hot air back down from the top where it comes in from the fire box.

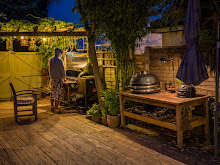
Adding outdoor lighting for nighttime BBQ cooking sessions
After numerous BBQ sessions where the light disappeared at the key moment, adding good lighting directly over the grill to be able to see what is cooking easily (that that you are supposed to open the lid often) was an essential requirement for the cooking area.

The 'Beast' Offset Smoker
 Reviewed by smokingbbqbadboy
on
May 02, 2023
Rating:
Reviewed by smokingbbqbadboy
on
May 02, 2023
Rating:
Reviewed by smokingbbqbadboy
on
May 02, 2023
Rating:


No comments:
Food, recipe or travel comments only please!